So I finally have given a go at setting up a Raspberry Pi cluster. It was a rather simple process, but maybe because of my IT nerd background. There were a few pit-stops to do in a few places to have the rights environments and configurations.
I used a lot of content from NetworkChuck video and adjusted to my needs.
We are going to use Rancher k3s version as it is lightweight and perfect for Raspberry Pi. We will also setup their Rancher dashboard to monitor easily the cluster.
Pre-Requisites
These is the list of material and environments needed to complete the creation of the cluster
Hardware
You need at least a Raspberry Pi, obviously 😀
But here is my full list:
- 1 x Raspberry Pi 4 Model B – 8GB RAM
- 2 x Raspberry Pi 4 Model B – 4GB RAM
- 1 x small LAN hub 5 ports
- 3 x 50cm LAN cables
- 1 x 2m LAN cable (use the length you need to get to your router)
- 1 x 60W USB power supply. My model is the “White Xiaomi USB 60W Fast Charger 6 Ports”

- 3 x USB to Type-C cables

- 1 x Raspberry Pi 4 4-Layers Acrylic Cluster Case (you can use the type and model you want, I will probably print a nicer looking one in the future)
- SD-Card reader/writer
Software
You will also need some software:
- Raspberry Pi Imager or similar tool to write the SD-Card
- An Ubuntu version 18.04 or 20.04 with docker installed (see Rancher support matrix). I am using on a VirtualBox, the Ubuntu Server version (not desktop) and selected the
Brideged Adapterfor the Network. - A text editor as a pad place to copy/paste
Setting up the RPis
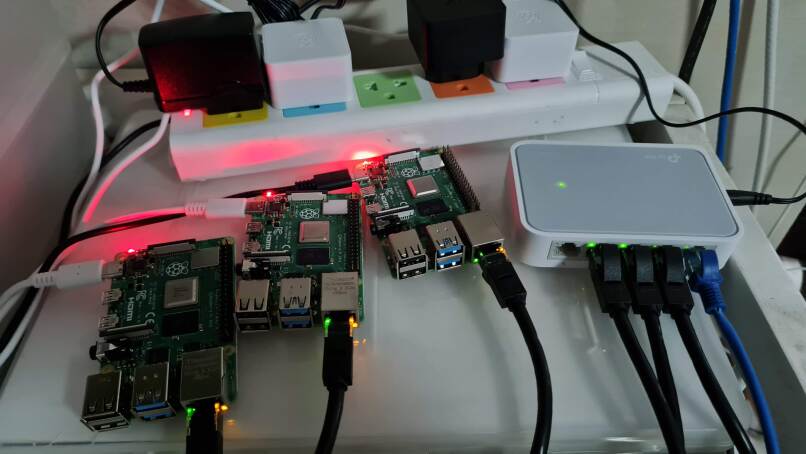
Let’s get done. First you’ll need to assemble the main components. Here is a work-in-progress that connects the RPIs to the LAN hub.
Baking the base stack
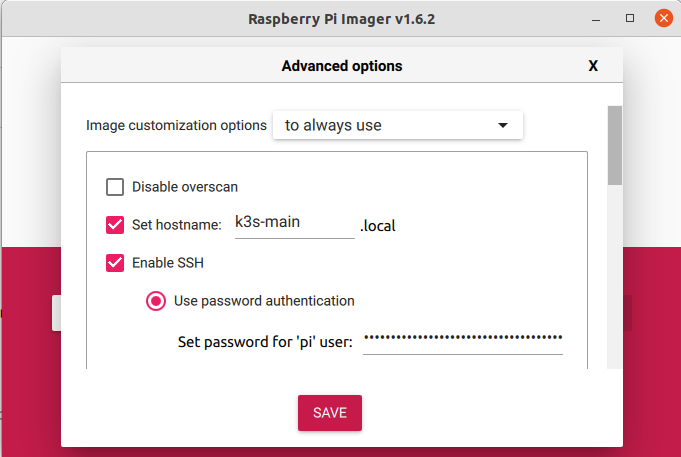
Next, use the Raspberry Pi imager to install the OS version. Select

Then the Raspberry Pi Lite version.

Then Press CTRL+SHIFT+X (your OS may vary) to bring the customization popup. Enable SSH. You can also provide the hostname if you want.
Once you got your SD-Card prepared, put it in the RPi and let it boot. Don’t connect any HDMI or keyboard to it, just let it boot and wait about 1 minute.
After 1 minute, check the green LED doesn’t blink (or very slowly) then disconnect the power. YES! You heard me 😀 Don’t worry, there is nothing running that requires a clean shutdown. It’s a Raspberry Pi!
Take the SD-Card and put it back on your computer. Then go to the partition marked as boot. You will need to modify 2 files on his partition:
- cmdline.txt:
Add the following at the end of the line:cgroup_memory=1 cgroup_enable=memory hdmi_blanking=2 ip=<the static IP address>::<your network gateway>:<your network mask>:<the RPi hostname>:eth0:off
For example that could becgroup_memory=1 cgroup_enable=memory hdmi_blanking=2 ip=192.168.1.10::192.168.1.1:255.255.255.0:k3s-main:eth0:off
What does all of this do? Let’s have a look:
- cgroup_enable=memory: enable in the kernel to use the Control Groups to limit memory per process. It is disabled by default.
- cgroup_memory=1: I couldn’t find more information about it, but it seems this is no longer a kernel flag and could be ignored. It is supposedly replaced by the
cgroup_enable=memorysetting. - hdmi_blanking=2: this is to disable fully the HDMI ports. A value of 1 would allow to re-enable by software/command line and 0 (default) enables the HDMI ports.
- ip=[…]: sets the IP Address, the dns serveer (I skipped so there are double
:), the netmask, the hostname in the /etc/hosts file, the name of the NIC and whether we want to turn on or off the auto configuration.
If you are using a Raspberry Pi 5, you might want to add
rfkill.default_state=0
at the end of the cmdline.txt to avoid getting rfkill error when doing sudo operations.
- config.txt
- Add after the line
# Additional overlays and parameters are documented /boot/overlays/READMEdtoverlay=disable-wifi
dtoverlay=disable-bt
This will disable WiFi and Bluetooth
- Modify on the line
dtparam=audio=on
todtparam=audio=off
This will disable the audio. - Add on the last line after the
[all]sectionarm_64bit=1
This will enable 64bit support
- Add after the line
Now disconnect the SD-Card then place it back in the RPi. Connect the power.
After a while you should be able to ping the configured IP address. When you can, you’re ready for the next step.
Setting up the OS
On the server node only
It is time to configure the RPi base stack before we put k3s on it. Let’s SSH to the RPi. Adjust the username and IP address to your setup:
ssh [email protected]Then let’s update and configure the base. Run a command at a time if you want to follow the progress or troubleshoot an issue. You should be able to run these commands multiple times in case something doesn’t work as expected
sudo apt update
sudo apt upgrade -y
sudo apt install iptables rsyslog ansible git vim -y
sudo iptables -F
sudo update-alternatives --set iptables /usr/sbin/iptables-legacy
sudo update-alternatives --set ip6tables /usr/sbin/ip6tables-legacy
The first 2 commands simply update the OS to latest packages.
k3s needs iptables to configure the network and allow connectivity in/out of nodes. But it doesn’t support the newer version so we need to use the iptables-legacy instead. The update-alternatives commands help to do that elegantly by mapping the command iptables to the iptables-legacy binary.
We install rsyslog to centralize the logging to the main server. We will need git later to install helm plugins. I installed vim because I like it 😛
Finally we also install ansible so we can configure all nodes OSes from the server node. To configure ansible, open (or create) a /etc/ansible/hosts file:
[control]
server  ansible_connection=local

[workers]
node01  ansible_connection=ssh
node02  ansible_connection=ssh
node03  ansible_connection=ssh

[all:children]
control
workers
In order to be able to reach those workers from the server node, we also need to inform in the /etc/hosts file what are their IP addresses:
192.168.0.11 node01 node01.local
192.168.0.12 node02 node02.local
192.168.0.13 node03 node03.local
Then reboot (sudo reboot) your RPi.
Let’s configure nodes operating system using ansible. First, let’s allow running as root on all nodes by adding our SSH key
sudo su -
cd
mkdir -p ~/.ssh
chmod 700 ~/.ssh
# In the next command, just press ENTER key for any question asked
ssh-keygen -t rsa
ssh-copy-id -i ~/.ssh/id_rsa.pub root@node01
ssh-copy-id -i ~/.ssh/id_rsa.pub root@node02
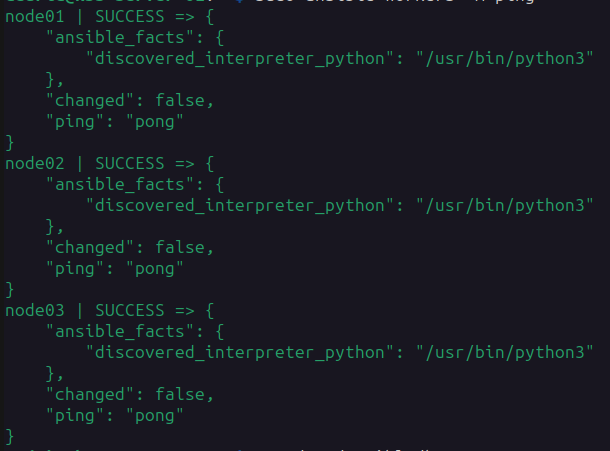
ssh-copy-id -i ~/.ssh/id_rsa.pub root@node03Let’s test it
sudo ansible workers -m pingThis should show you something like this
Let’s update the nodes with basic stuff:
sudo ansible workers -b -m shell -a "apt update"
sudo ansible workers -b -m shell -a "apt upgrade -y"
sudo ansible workers -m apt -a "name=iptables state=present" --become
sudo ansible workers -m apt -a "name=rsyslog state=present" --become
sudo ansible workers -b -m shell -a "reboot"
Installing centrallized logging
Server node
On the main server node, configure rsyslog to receive logs from other nodes.
First edit the /etc/rsyslog.conf file and un-comment the following lines:
# provides UDP syslog reception
module(load="imudp")
input(type="imudp" port="514")

# provides TCP syslog reception
module(load="imtcp")
input(type="imtcp" port="514")
Next we configure rsyslog by creating a /etc/rsyslog.d/central.conf with this content:
$template RemoteLogs,"/var/log/central/%HOSTNAME%.log"
*.*  ?RemoteLogs
Then create the centralized folder:
sudo mkdir /var/log/centralFinally add a /etc/logrotate.d/central configuration to rotate the logs
/var/log/central/*.log
{
        rotate 4
        weekly
        missingok
        notifempty
        compress
        delaycompress
        sharedscripts
        postrotate
                invoke-rc.d rsyslog rotate >/dev/null 2>&1 || true
        endscript
}
Finally restart rsyslog
sudo systemctl restart rsyslogWorker nodes
To setup the worker nodes, we only need to tell rsyslog to send logs to the main node.
We’re going to edit the /etc/hosts and /etc/rsyslog.conf files on the nodes using ansible:
sudo ansible workers -b -m shell -a "echo '192.168.1.10 k3s-server-01 k3s-server-01.local' | tee -a /etc/hosts"
sudo ansible workers -b -m shell -a "echo '*.* @@k3s-server-01.local:514' | tee -a /etc/rsyslog.conf"
sudo ansible workers -b -m shell -a "systemctl restart rsyslog"
Installing Kubernetes (k3s version)
Once all your RPis are up and running you are ready to create your kubernetes cluster.
Setting up the main node
SSH to the RPi you want to be the main node. Then execute the following commands:
sudo su -
curl -sfL https://get.k3s.io | sh -s - --write-kubeconfig-mode 644 --disable servicelb --node-taint CriticalAddonsOnly=true:NoExecute --bind-address 192.168.1.10 --disable-cloud-controller --disable local-storage
cat /var/lib/rancher/k3s/server/node-token
The last command will display a token that looks like this:
K104123450ec5bbe9d3b412a6b3de2d241b2a64c0d273685446e35171e79f94a38f::server:7512345c1234abbb0f65ea32d9874edcThis will be used to configure the nodes to attach to the main. That’s it, it’s ready. Give it a try by typingkubectl get nodes
It should display something like this

Setting up the worker nodes
Again we are going to use ansible to setup the worker nodes:
sudo ansible workers -b -m shell -a "curl -sfL https://get.k3s.io | K3S_URL=https://192.168.0.10:6443 K3S_TOKEN=K104123450ec5bbe9d3b412a6b3de2d241b2a64c0d273685446e35171e79f94a38f::server:7512345c1234abbb0f65ea32d9874edc sh -"And voilà! Your cluster is ready. From the main node, you can run the kubectl get nodes command again and you will get:

Load Balancer
In order to access the applications running services, we need a Load Balancer that will distribute available IP addresses. I am going to use metallb for that.
It is much easier to install metallb with the help of helm, so we’ll install it on the server node.
Helm
I had trouble getting helm using my kube cnfig file. Here is how I could get it to work:
sudo k3s kubectl config view --raw > ~/.kube/config
chmod 600 ~/.kube/config
sudo mkdir /usr/local/src/helm
cd /usr/local/src/helm
sudo curl -fsSL -o get_helm.sh https://raw.githubusercontent.com/helm/helm/main/scripts/get-helm-3
sudo chmod 700 get_helm.sh
sudo ./get_helm.sh
Verify that all is working
helm versionThis should display something like:
version.BuildInfo{Version:"v3.14.1", GitCommit:"e8858f8696b144ee7c533bd9d49a353ee6c4b98d", GitTreeState:"clean", GoVersion:"go1.21.7"}Metallb
To install metallb :
helm repo add metallb https://metallb.github.io/metallb
helm search repo metallb
helm --kubeconfig ./.kube/config upgrade --install metallb metallb/metallb \
--create-namespace --namespace metallb-system --wait
This will display an output like this:
Release "metallb" has been upgraded. Happy Helming!
NAME: metallb
LAST DEPLOYED: Thu Feb 15 21:21:58 2024
NAMESPACE: metallb-system
STATUS: deployed
REVISION: 2
TEST SUITE: None
NOTES:
MetalLB is now running in the cluster.

Now you can configure it via its CRs. Please refer to the metallb official docs
on how to use the CRs.
Now create a configuration file ~/metallb-pool.yaml
apiVersion: metallb.io/v1beta1
kind: IPAddressPool
metadata:
  name: default-pool
  namespace: metallb-system
spec:
  addresses:
  - 192.168.1.120-192.168.1.150
---
apiVersion: metallb.io/v1beta1
kind: L2Advertisement
metadata:
  name: default
  namespace: metallb-system
spec:
  ipAddressPools:
  - default-pool
Choose the IP address block that is available in your network, outside of your DHCP pool.
Next is to apply this configuration:
kubectl apply -f ~/metallb-pool.yamlThe output should be
ipaddresspool.metallb.io/default-pool created
l2advertisement.metallb.io/default created
Now we’re done with network. It is time to add some storage.
Storage
We will be using longhorn, a cloud native distributed block storage for Kubernetes.
Preparing the disks
First, I attached a USB drive to all the nodes I had. Let’s mount them to /data/nfs-01. We need a few tools to be installed:
sudo ansible workers -b -m apt -a "name=nfs-common state=present"
sudo ansible workers -b -m apt -a "name=open-iscsi state=present"
sudo ansible workers -b -m apt -a "name=util-linux state=present"
sudo ansible workers -b -m shell -a "mkdir /data"
Then we need to find the disk UUIDs, format them and configure them in the /etc/fstab. We will use variables in the ansible configuration to make it easy:
sudo ansible workers -b -m shell -a “lsblk -f”
You will see 2 types of disks on each node. If you’re running from a micro-SD card, you will have a mmcblk0 disk, then a second disk which for me is named sda. Therefore I will add in my /etc/ansible/hosts file a new variable for sda:
[control]
server  ansible_connection=local

[workers]
node01  ansible_connection=ssh var_disk=sda
node02  ansible_connection=ssh var_disk=sda
node03  ansible_connection=ssh var_disk=sda

[all:children]
control
workers
Then I can use this commands to wipe the disks and format them as ext4 filesystem:
sudo ansible workers -b -m shell -a "wipefs -a /dev/{{ var_disk }}"
sudo ansible workers -b -m filesystem -a "fstype=ext4 dev=/dev/{{ var_disk }}"
Once this is done, we can collect their UUIDs and add them in the /etc/ansible/hosts file again:
sudo ansible workers -b -m shell -a "blkid -s UUID -o value /dev/{{ var_disk }}"Then edit the /etc/ansible/hosts file to add the variable:
[control]
server  ansible_connection=local

[workers]
node01  ansible_connection=ssh var_disk=sda var_uuid=e7ce3940-e623-4914-bae4-b0304e366237
node02  ansible_connection=ssh var_disk=sda var_uuid=37fg63d8-70df-43e1-8e60-bbabe36fb975
node03  ansible_connection=ssh var_disk=sda var_uuid=adbb8482-c576-406d-8c25-4d4cdae270c1

[all:children]
control
workers
Finally let’s attach the disks to /data/nfs-01:
sudo ansible workers -m ansible.posix.mount -a "path=/data/nfs-01 src=UUID={{ var_uuid }} fstype=ext4 state=mounted" -bLet’s reboot and check the disks are still there:
sudo ansible workers -b -m shell -a "reboot"
# when rebooted
sudo ansible workers -b -m shell -a "lsblk -f"
Installing Longhorn
We will use helm again:
helm repo add longhorn https://charts.longhorn.io
helm repo update
helm install longhorn longhorn/longhorn --namespace longhorn-system --create-namespace /
--set defaultSettings.defaultDataPath="/data/nfs-01"
The following should show after a few seconds
NAME: longhorn
LAST DEPLOYED: Sat Feb 17 16:44:20 2024
NAMESPACE: longhorn-system
STATUS: deployed
REVISION: 1
TEST SUITE: None
NOTES:
Longhorn is now installed on the cluster!

Please wait a few minutes for other Longhorn components such as CSI deployments, Engine Images, and Instance Managers to be initialized.

Visit our documentation at https://longhorn.io/docs/
Then wait for several minutes and check the namespace pods:
kubectl --namespace longhorn-system get podsWhich took about 10 minutes to finally display:
NAME                                                  READY   STATUS    RESTARTS   AGE
longhorn-recovery-backend-55ff55568f-jnwjm            1/1     Running   0          8m6s
longhorn-ui-5699bfb75c-ckm4k                          1/1     Running   0          8m5s
longhorn-conversion-webhook-845fd477db-g866t          1/1     Running   0          8m5s
longhorn-ui-5699bfb75c-4pwt9                          1/1     Running   0          8m6s
longhorn-conversion-webhook-845fd477db-pzk5c          1/1     Running   0          8m5s
longhorn-recovery-backend-55ff55568f-n67fk            1/1     Running   0          8m5s
longhorn-admission-webhook-5d9fb56c4c-8gvjr           1/1     Running   0          8m6s
longhorn-admission-webhook-5d9fb56c4c-wpd4n           1/1     Running   0          8m5s
longhorn-manager-wfw5h                                1/1     Running   0          8m6s
longhorn-manager-cxpls                                1/1     Running   0          8m6s
longhorn-driver-deployer-5c54fc546f-vs42q             1/1     Running   0          8m5s
csi-attacher-65ffcb76df-7thll                         1/1     Running   0          6m22s
csi-snapshotter-96dc7448b-zdbs9                       1/1     Running   0          6m20s
csi-provisioner-7994564bb6-cv5rg                      1/1     Running   0          6m21s
csi-attacher-65ffcb76df-54ssw                         1/1     Running   0          6m22s
longhorn-csi-plugin-bln4s                             3/3     Running   0          6m19s
csi-resizer-759bc98bc5-jzdsb                          1/1     Running   0          6m21s
csi-resizer-759bc98bc5-hb2xs                          1/1     Running   0          6m21s
longhorn-csi-plugin-kv6nl                             3/3     Running   0          6m19s
csi-provisioner-7994564bb6-rh9jn                      1/1     Running   0          6m22s
csi-snapshotter-96dc7448b-46fmt                       1/1     Running   0          6m20s
csi-provisioner-7994564bb6-gjg25                      1/1     Running   0          6m21s
csi-attacher-65ffcb76df-pqtdd                         1/1     Running   0          6m22s
csi-snapshotter-96dc7448b-7xhbp                       1/1     Running   0          6m20s
csi-resizer-759bc98bc5-gbm4h                          1/1     Running   0          6m21s
longhorn-csi-plugin-jvrrb                             3/3     Running   0          6m19s
engine-image-ei-f9e7c473-xkswq                        1/1     Running   0          6m40s
instance-manager-e-23f1f284548becb3b20380a1f39a7f6d   1/1     Running   0          6m40s
engine-image-ei-f9e7c473-5sfqc                        1/1     Running   0          6m40s
instance-manager-r-23f1f284548becb3b20380a1f39a7f6d   1/1     Running   0          6m40s
instance-manager-e-9464ee25ed4b83262bcae0dc6e62016a   1/1     Running   0          6m39s
instance-manager-r-9464ee25ed4b83262bcae0dc6e62016a   1/1     Running   0          6m38s
engine-image-ei-f9e7c473-8cnmk                        1/1     Running   0          6m40s
longhorn-manager-d7vj8                                1/1     Running   0          3m33s
instance-manager-e-082ee7ee1dd33ab15d3c99d7b15d4f8d   1/1     Running   0          3m38s
instance-manager-r-082ee7ee1dd33ab15d3c99d7b15d4f8d   1/1     Running   0          3m38s
Next is to add the service to the longhorn UI. Since we have our load balancer, I’ll choose the first IP of the pool to assign it to this service. Create a longhorn-service.yaml:
apiVersion: v1
kind: Service
metadata:
  name: longhorn-ingress-lb
  namespace: longhorn-system
spec:
  selector:
    app: longhorn-ui
  type: LoadBalancer
  loadBalancerIP: 192.168.1.121
  ports:
    - name: http
      protocol: TCP
      port: 80
      targetPort: http
Then apply it with kubectl apply -f longhorn-service.yaml. It should show:
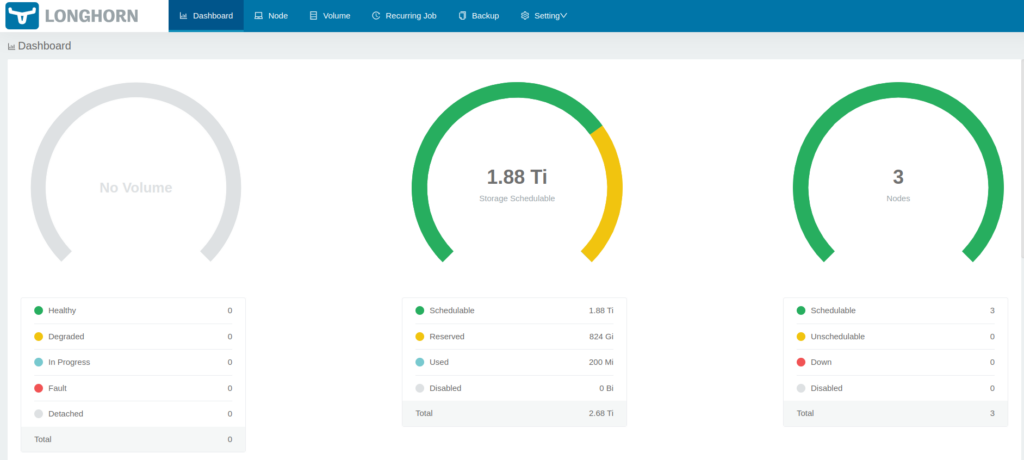
service/longhorn-ingress-lb createdYou can now open a browser to the IP you used in the configuration above and you’ll get the longhorn UI dashboard.
Finally let’s remove local storage from being a default storage class:
kubectl patch storageclass local-path -p '{"metadata": {"annotations":{"storageclass.kubernetes.io/is-default-class":"false"}}}'Now the default storage class is longhorn only:
kubectl get storageclassThis will show
NAME                 PROVISIONER             RECLAIMPOLICY   VOLUMEBINDINGMODE      ALLOWVOLUMEEXPANSION   AGE
longhorn (default)   driver.longhorn.io      Delete          Immediate              true                   16m
local-path           rancher.io/local-path   Delete          WaitForFirstConsumer   false                  31m
See that the local-path isn’t default.
Applications
The next steps are to install my default applications there:
– Pi-hole
– transmission
– Plex