Understanding the basics of containerization and why it’s important
Developers can package an application, its dependencies, and its configuration into a portable container using the technology known as containerization. Since containers are separate from one another, an application running in one container has no impact on applications running in other containers. They provide reliable and reproducible environments and launch quickly. They are therefore a wise solution for setting up and controlling applications either on-site or in the cloud.
Containerization is significant because it may give applications an uniform runtime environment and solve the “this works on my machine” issue. A developer’s laptop to a test environment or a test environment to a production environment are just a couple examples of how easily an application may be moved between environments thanks to this. Additionally, containerization is perfect for multi-tenant situations since it guarantees that issues with one application won’t affect other apps operating on the same server. The ability to run numerous applications on the same infrastructure promotes effective resource use, which lowers costs.
Overview of Kubernetes and its role in container orchestration
Kubernetes is an open-source container orchestration system that may be used to manage the deployment, scaling, and maintenance of containerized applications. By providing a platform-neutral method of managing containers across different hosts, it makes sure they are working as intended. The Cloud Native Computing Foundation currently maintains it after Google founded it (CNCF).
In essence, Kubernetes makes it simple for individuals to run and manage several containers at once. It ensures everything happens without a hitch and will attempt to correct any problems on its own.

Understanding Kubernetes architecture and the main components of a Kubernetes cluster
Kubernetes architecture is composed of a set of components that work together to provide an environment for managing containerized applications. The main components of a Kubernetes cluster are:
- The Master Node: This is the control plane of the cluster, responsible for maintaining the desired state of the cluster and making decisions on how to change the state. The master node comprises several components such as the API server, etcd and controller manager.
- The Worker Nodes: These are the machines (virtual or physical) that run the containerized applications. Each worker node runs a container runtime (such as Docker) and the kubelet, which communicates with the master node to ensure the desired state of the cluster is achieved.
- Pods: Pods are the smallest and simplest unit in the Kubernetes object model and the atomic unit of scheduling. A pod represents a single instance of a running process in your cluster.
- Services: Services are used to expose the pods to the network and to load balance traffic between pods.
- Replication Controllers: Replication Controllers ensure that a specified number of replicas of a pod are running at any given time.
- Deployments: A deployment is an abstraction of a Replication controller, it provides declarative updates for Pods and Replication Controllers.

Installing and configuring minikube on a local machine
Setting up a Kubernetes cluster on a local machine with minikube
Minikube (https://minikube.sigs.k8s.io/docs/) is a minimal Kubernetes implementation that builds a single-node, simple cluster as a virtual machine on your local system. Windows, macOS, and Linux operating systems all support Minikube.
Installing VirtualBox
Follow the installation process in this post. Then start the VM and SSH to it.
Installing kubectl and minikube
Pre-requisites
You will need the following dependencies installed:
- Docker
| $ $ $ $ $ $ $ | sudo apt remove docker docker-engine docker.io containerd runc |
Logout and re-login to have the docker group applied to your user
kubectl
| $ $ $ $ | mkdir -p ~/.local/bin |
If the last command fails, you might need to close your terminal and open a new one as the path to ~/.local/bin is not automatically added if it didn’t exist before.
minikube
| $ $ $ | curl -s -L https://storage.googleapis.com/minikube/releases/latest/minikube-linux-amd64 -o /tmp/minikube-linux-amd64 sudo install /tmp/minikube-linux-amd64 /usr/local/bin/minikube minikube start |
You should be greeted with this screen (once it has downloaded all installation files):

Verify you can see the cluster using the standard kubectl command. Wait that all pods are in the READY state and RUNNING
| $ | kubectl get pods -A |
This should give you
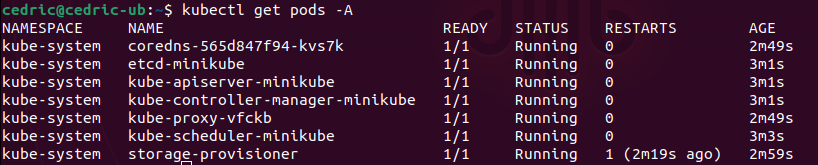
Congratulations, you have a k8s cluster running on your machine!
To delete the minikube cluster:
| $ | minikube delete --all |
Creating and deploying a Kubernetes deployment
Creating a deployment
At the base of a k8s deployment, there are YAML files that describe the assets we want to manipulate:
- creation
- modification
- Deletion
Namespace
To view the current namespaces:
| $ | kubectl get namespaces |

It is a good practice to keep a namespace for each application you create so it is easier to find the assets in a cluster that has multiple applications
To create a namespace:
- Create a file 01-setup.yaml
- Copy the content of the Namspace YAML from the Annexes in the 01-setup.yaml file
- Save the file
- Execute the command:
| $ | kubectl apply -f 01-setup.yaml |
The `apply` method instruct the kubectl command to create the assets described by the file passed by the `-f` parameter

In the namespace YAML file, we define very few things:
- apiVersion: the k8s API version we want to use
- kind: the kind of asset we want to manipulate. Here we want a Namespace. Mind the capital first letter. Kubectl command will return an error if you keep the type lowercase
- metadata: here we can put some high level configuration information. Usually this is used to set a name, or to specify the namespace to use (for other kind of assets)
Deployment
A Deployment provides declarative updates for Pods and ReplicaSets.
You describe a desired state in a Deployment, and the Deployment Controller changes the actual state to the desired state at a controlled rate. You can define Deployments to create new ReplicaSets, or to remove existing Deployments and adopt all their resources with new Deployments.
To create a deployment:
- Create a file 02-deployment.yaml
- Copy the content of the Deployment YAML from the Annexes in the 02-deployment.yaml file
- Save the file
- Execute the command:
| $ | kubectl apply -f 02-deployment.yaml |

There is a few more configuration in the YAML:
- kind: here we specify a Deployment. This will create the pods instances.
- metadata.namespace: as mentioned above, this is to attach the asset to the namespace
- metadata.labels: this is to give a label to the deployment. This label can be referred to in other configurations to create associations (i.e. to attach a service to the deployment)
- spec: this is the main configuration for the deployment
- spec.selector.matchLabels: we associate the following configuration to the label created above. Note this could be any label of any other asset that can be associated to a deployment
- spec.selector.replicas: this is how to declare how many pods we want to create. Note you will need to have enough resources in your cluster to start the requested number of pods.
- spec.template: this is the template of the configuration that defines your pods
- spec.template.metadata.labels: this defines the pods template. This needs to match an existing spec.selector.matchLabels
- spec.template.metadata.spec: this defines the pod itself
- spec.template.metadata.spec.containers: this defines a pods based on a container with associated configuration. Note the containerPort defines with port from the container is exposed
The pod has been created, the READY columns shows that 1 pod out of 1 pod requested is ready with the status “Running”. There has been no restart so far.
The application `nginx` is running, but we haven’t configured a service to expose the port, so for now the deployment is contained.
Service
In Kubernetes, a Service is an abstraction which defines a logical set of Pods and a policy by which to access them (sometimes this pattern is called a micro-service). The set of Pods targeted by a Service is usually determined by a selector. To learn about other ways to define Service endpoints, see Services without selectors.
For example, consider a stateless image-processing backend which is running with 3 replicas. Those replicas are fungible – frontends do not care which backend they use. While the actual Pods that compose the backend set may change, the frontend clients should not need to be aware of that, nor should they need to keep track of the set of backends themselves.
The Service abstraction enables this decoupling.
To create a service:
- Create a file 03-service.yaml
- Copy the content of the Service YAML from the Annexes in the 03-service.yaml file
- Save the file
- Execute the command:
| $ | kubectl apply -f 03-service.yaml |

In the 03-service.yaml YAML, the new items are:
- kind: the type is Service
- spec.type: here we create a NodePort type of Service. This type allows for a custom type of configuration. We will see the other types later.
- spec.ports: we must configure the port. Here we’re mapping the targetPort (the port the application is listening to) to the port 8080. Every node in the cluster configures itself to listen on the nodePort and to forward traffic to one of the ready endpoints associated with that Service.
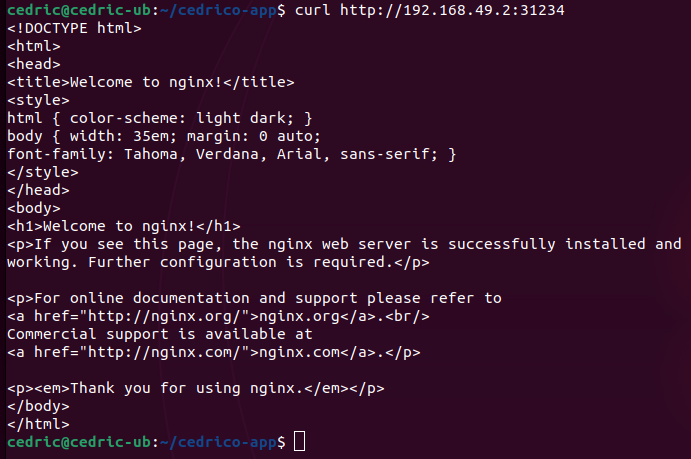
To find how to connect to the service, find the IP address of the cluster:
| $ | minikube ip |
This will display the IP address. If you hadn’t specified the nodePort in the configuration YAML, you can access it by using a JSON path output:
| $ | kubectl get service --namespace cedrico-app-ns \ |
Then you can access the application by doing
| $ | curl http://<cluster_ip>:<nodeport> |
Debugging a pod
Ideally, each application should log either to the standard output or to a file or even better to an external logging system. But sometimes you don’t have that. There are a few commands you can use to explore a pod.
Getting standard output
To access the standard output of a pod, simply execute the following commands:
- Get the name of the running pods in your application namespace
$ | kubectl get pods --namespace cedrico-app-ns \ |
- Get the standard output (use the name of the pod)
| $ | kubectl logs -f --namespace cedrico-app-ns \ |
The “-f” parameter is for streaming. Remove it if you just want the output once.
Connecting to a pod
To get a shell on a pod, find it’s name then
| $ | kubectl exec --stdin --tty --namespace cedrico-app-ns \ |
Scaling a deployment
There are 2 common ways to scale (in or out) a deployment. They are:
- Enable autoscale on the Deployment (here we add 2 replicas by setting 3)
| $ | kubectl autoscale deployment cedrico-app-deployment \ |
- Or update the Deployment number of replicas and enter the apply command again
Wait for a while then you should get 3 pods running:

To delete an autoscale configuration (and downscale back to 1 replica)
| $ $ | kubectl delete hpa cedrico-app-deployment --namespace cedrico-app-ns |
Here, hpa stands for HorizontalPodScaler.
Deleting resources
To delete the resources created via YAML (and optionally the autoscale configuration)
| $ $ $ $ | kubectl delete hpa cedrico-app-deployment --namespace cedrico-app-ns |
Annexes
YAML files
Namespace
apiVersion: v1 |
Deployment
apiVersion: apps/v1 |
Service
apiVersion: v1 |
Ingress
apiVersion: networking.k8s.io/v1 |